Showing posts with label DIY. Show all posts

Sunday, October 12, 2014

DIY: Leather Bracelet

 
Hi Guys! Today I have an easy 5 minute DIY project for you.
All you need are a few simple materials:
Stencil
revolving punch
9'' of leather trimming
1 round screw back stud
 
 
Step 1: Use the stencil and trace in your desired text, in this case eagles
 
 
Step 2: Use the revolving punch and punch a hole at the bottom and the top of the leather strap


Step 3: Screw the stud into the hole on the bottom of the strap


Done!


Monday, October 17, 2011

Celeb Inspired Infinity Scarf


My inspiration


Remember as this is a Craftynovice blog, NOVICE being the operative word, everything I post on here for the most part is basic and with a few foundation techniques you should be able to make everything I write about. That said, if you have some free time, give this scarf a try.
If you've mastered the slipknot, chain and double crochet this project will be a sinch.

Matierals Needed:
2 Balls of Yarn
H Crochet Hook
Darning Needle

For this project, I used vanna's choice yarn (that's right, vanna white has her very own yarn, who knew!), and I used the following double crochet scarf pattern (similar to beginners scarf pattern with 2 extra chains)

Chain 18
Row 1: Double crochet in the 4th chain from the hook and in each chain across.
Row 2: Chain 3, turn, double crochet in each double crochet across.
Repeat Row 2 until you've used up all of the first ball of yarn and almost all of the 2nd (leave 3 feet of yarn at the end)

Your scarf should look something like this:


When you have 3 feet of yarn left, and you've reached the end of your last row, chain one, and pull the three feet of yarn all the way through the loop


Now thread the darning needle


Match up both ends of the scarf (make sure it's not twisted)


Using the darning needle, sew both ends together


After you've completed sewing both ends together, tie off and cut off excess yarn.

Now, to wear just continously wrap around your neck; all done!!

Wednesday, September 28, 2011

DIY Bedazzled Flats

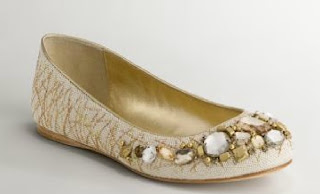
Well...it's finally fall, which means it's about that time to retire those flip flops for the season, and bring out the flats! My personal favorite flat is round toe and somewhat bedazzled (in an understated somewhat professional fashion); after browsing on bloomingdales.com and remembering my love for my old banana republic flats, I decided this would be my next project.
These babies are my inspiration


What you'll need..
1 pair of canvas, pleather or leather (for the more expensive taste) flats
jewels of all sizes, shapes and colors (it's all up to your own personal preference)- I picked 10 of the exact same gems because I like things simple and symmetric!
hot glue gun

I chose these Lower East Side Flats from Payless $16.99


These gems from beadworld in manhattan $12.50 for 10


To begin, I pulled the backing off the gems


Then I placed a small dot of hot glue in each of the backings and glued the gems back into place (this ensures your gems don't fall out of the backing)
Now that your gems are all set to go, formulate a pattern and test it out by placing each piece on the top of your shoe


When you're happy with placement, start to glue each piece onto the shoe, NOTE you only need a small amount of glue, also begin with the middle piece and work out from there.

and ta Da!..custom bedazzled shoes!

Pin It