Sunday, January 11, 2015

DIY Sew: Iphone Case

 
Materials:
1/4 yard of fabric
1/4 yard of interfacing
1 magnetic snap
plastic iphone case
embroidery floss
 
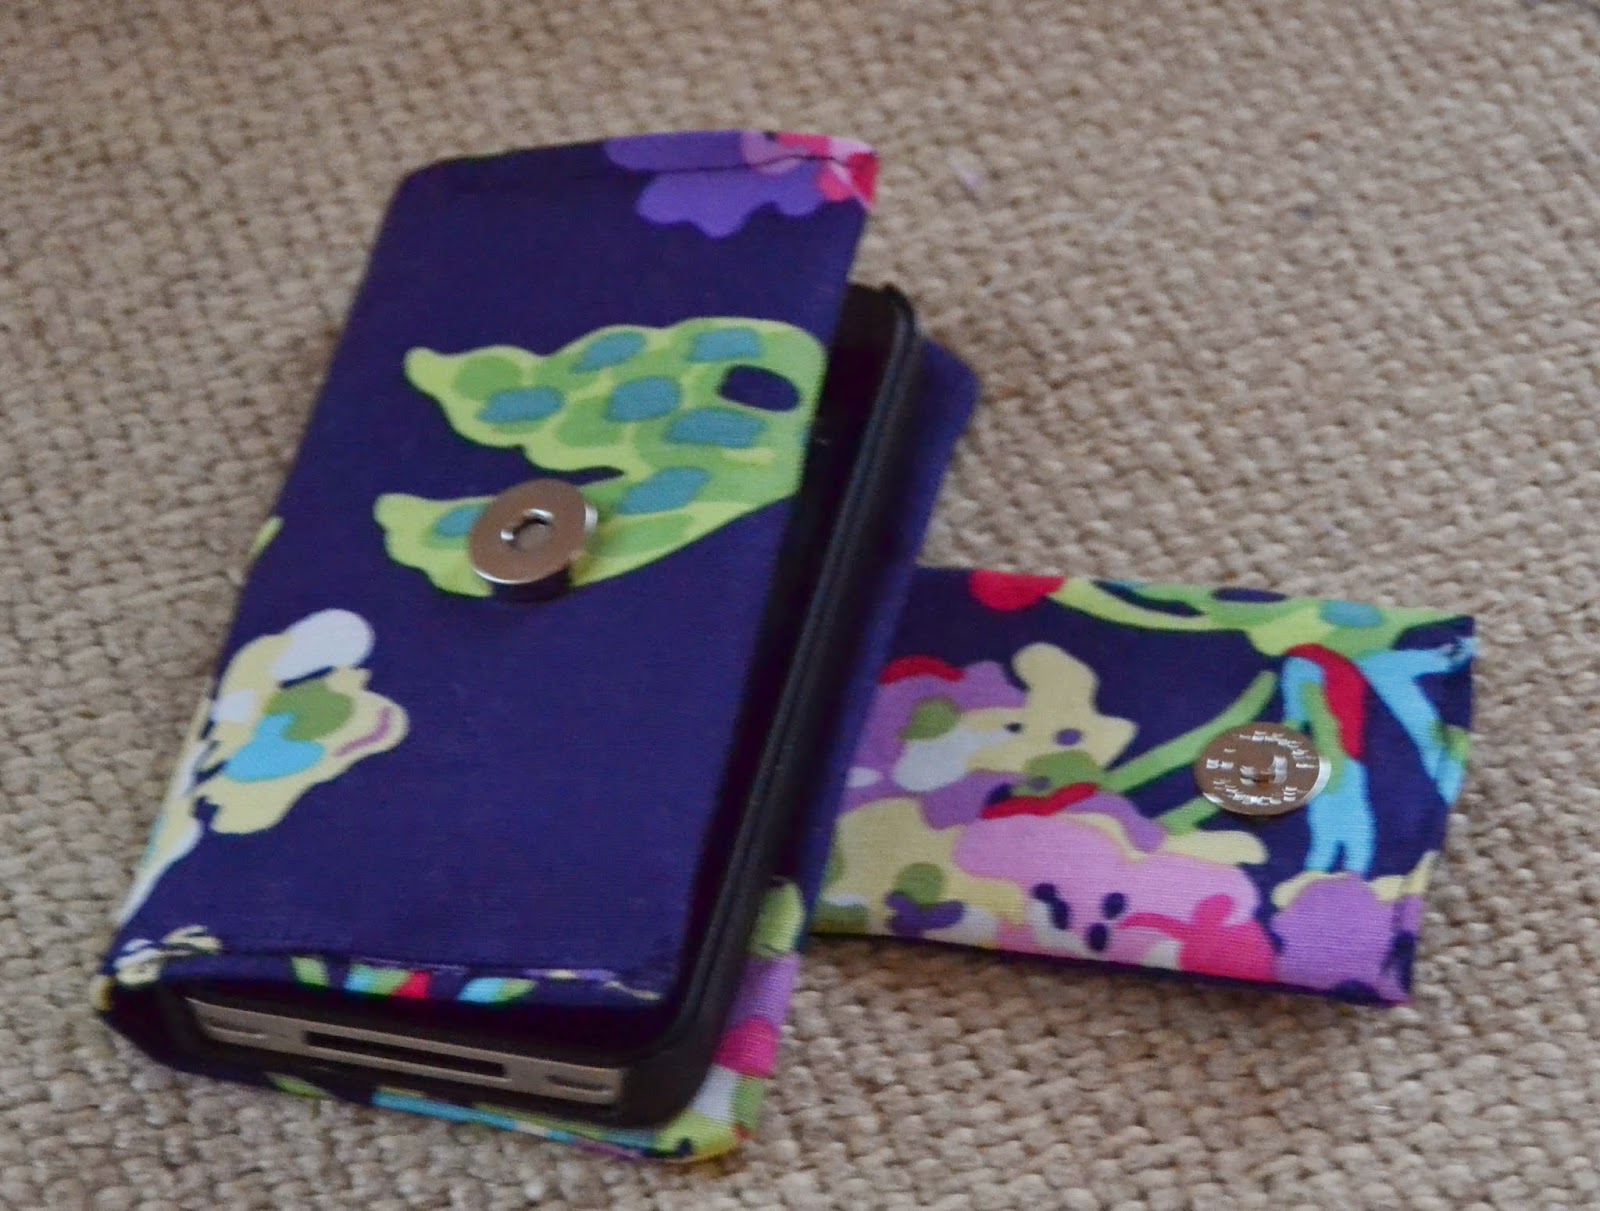
Step 1: Cut two pieces of interfacing: 4.25" x 2.5" and 8.5" x 5"
Cut two pieces of fabric: 8.5" x 2.5" and 8.5" x 10"
 
 
Step 2: Install snaps: use fabric chalk and draw a vertical line at 2.75" about an 1.5" in from there place a washer. Use a pen and mark both slits of the washer. Use scissors to cut slits where the marks are. Placing the interfacing under the fabric install the snap.


Step 3: With Good sides of fabric touching pin and sew three sides of the fabric


Step 4: Fold in fabric on side you did not yet sew, and sew


Step 5: Fold in fabric 2.5", pin and sew only the top and bottom


Step 6: Take your smaller piece of fabric and interfacing and install the opposite side of the snap. Mark slits, cut, install snap.


Step 7: Fold fabric over, pin and sew (top, bottom, and left side only)


Step 8: Turn fabric right side out, fold in remaining fabric and sew up right side only
 

Step 9: Sew the smaller piece of fabric onto the larger piece


Step 10: Cut out a hole for your phone's camera


Step 11: Use embroidery floss and sew around the edges of the camera hole


Step 12: Super glue a plastic iphone case into the inside back portion of your fabric, let dry, and pop in phone


Done!!


Thursday, January 1, 2015

DIY: Yarn Wrapped Bottle

Happy New Year! Here's a really easy craft to start the year off on a productive foot.
 

Materials:
Hot Glue Gun
Yarn (2 colors)
Empty wine bottle
 
Step 1: Peel the label off the wine bottle by soaking the bottle in soapy water
Step 2: Start from the top of the bottle, apply hot glue and wrap yarn around the bottle


Decorate with Michael's crafts fake flowers and you're done!


Sunday, November 30, 2014

DIY: Makeup Holder


Get ready for a quick, cute, cheap 30 minute DIY project...
Step 1: find an old dip/salsa container or mason jar
 

Step 2: Wash out the jar, and soak in soap in water. After about a half hour you should be able to easily pull off the label

 
Step 3: Using twine and a glue gun, glue and wrap twine around the lip of the jar

 
Step 4: Use tape to wrap jar (I went around 3 times). I used Little B: Gold Foil Moroccan Window; found here; for sale at A.C Moore.
 
 
Done!!


Sunday, November 23, 2014

DIY: Custom Cross Stitch Pillow


Materials:
1/2 yard of Burlap
Cross stitch ring
embroidery floss
1 20"x 20" pillow form (purchased here)
 
Step 1: Cross Stitch eagles onto burlap
Step 2: Sew along the edges of the fabric (to prevent fraying)
 

Step 3: Sew pillow using this tutorial


Thursday, November 13, 2014

DIY Sew: Beach Bag


In preparation for my mini vacation this weekend for my fiancé's birthday I decided to make myself a beach bag.  I had some burlap laying around and figured it would be an easy enough project.

Step 1: Cut 1 piece of burlap 19" by 34" and a second piece 3" by 50"
Step 2: Fold the edges of the 19" by 34" piece in twice on both ends, pin and sew
Fold the 50" by 3" piece in half, pin and sew, your piece should measure 1 1/2" by 50"

Step 3: Cut the 50" by 1 1/2" piece in half; you should now have 2x 25" by 1 1/2 inch pieces


Step 4: Pin and sew the Straps onto your bag (straps 7 inches apart)


Step 5: With straps touching (wrong side up) sew up the right and left sides of the bag
Step 6: measure 2 1/2 inches up from each corner (2) pin and sew
Step 6: Turn right side out. Use a stencil and paint on the first letter of your last name (in my case, my future last name)


Saturday, November 8, 2014

DIY Sew: Canvas Tote

 
A few weeks ago, I made this tote bag. I was so happy how it turned out I wanted to make another, this time in canvas.
 
I purchased 1 yard of 9.3 oz black canvas fabric from the website onlinefabricstore.com
For the lining, I used some flower fabric from my stash
 
Follow this tutorial, the only exception is to install the pocket to the lining fabric and not the canvas.