Sunday, December 22, 2013

Quick Christmas Gift Idea: Chevron Cross Stitch

Need a quick inexpensive handmade gift? Why not this chevron framed cross stitch? It would make a perfect Christmas gift or housewarming present.
 
I was able to make this pattern in just a few minutes in excel. The numbers on the pattern are the thread colors associated with the pattern.


Sunday, December 1, 2013

Cross Stitch: Home Sweet Home


After ages of wanting to learn how to cross stitch this weekend I finally found the time to hit up Michaels for supplies, and then head to YouTube for some trusty tips. I'd been seeing a ton of fun patterns on etsy, but considering I am brand new to cross stitch I thought it'd be best to start off small and simple.  On Pinterest I saw a cute "home sweet home" cross stitch and I thought it looked easy enough to recreate, but the problem was there was no pattern associated with the pin.

I thought to myself that there must be an easy enough way to figure out the pattern on my own.  The first thing I reached for was graph paper as the tiny squares on the paper are perfect for making a pattern.  To start I google searched free heart patterns; and copied down a small heart that was fitting for what I wanted.
 
 
Now that I had a portion of my pattern I decided it was time to prep my materials and try out cross stitch.
Materials Checklist:
14 Count Aida Fabric
Tapestry Needle
Wooden Hoop
Embroidery thread
 
Here's what I did:
1. I placed the hoop over/under the Aida fabric and tightened the tension
2. threaded the tapestry needle with 3 strands of embroidery thread (note: the thread comes in 6 strands)
3. Found the center of my fabric and pattern
4. Began sewing following the pattern (note: when threading the needle in for the first stitch make sure you leave a tail, do NOT make any knots)


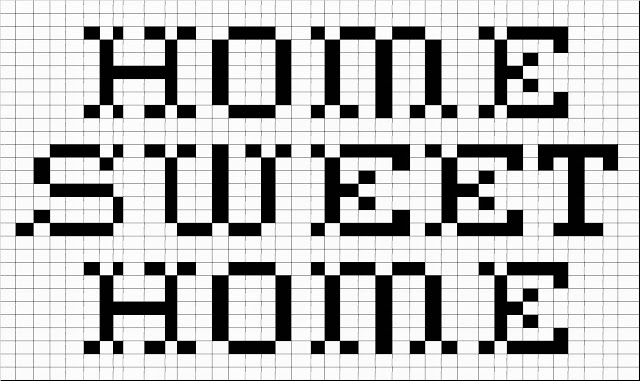
 Now, for the second portion of the pattern I needed to create letters.  For this I was actually able to copy down the pattern by just looking at the picture I had for inspiration; to save you the work, the pattern is below:
 
 
Then, the only thing I had left to do was frame it! I cut the fabric to the size of the frame and that was it!


Monday, November 25, 2013

DIY: Embellished Sweatshirt


Over the weekend I teamed up with a few friends, one among them Ashley from Smashing Style, to bedazzle sweatshirts.  The entire process was beyond easy and inexpensive.   

I made mine out of a Hanes sweatshirt from Walmart and some gems from M and J Trimming.
I placed the gems out on the sweatshirt, then used fabric glue to glue each gem down.  From here I used a needle and thread to reinforce each gem. That simple!


Wednesday, November 6, 2013

Your Questions Answered: Crochet Open Shrug

I've been getting a few questions regarding this cozy Open Shrug I posted last year; I thought this week would be the perfect time to answer.

Reader Melinda writes "I absolutely love this but I feel very silly because I can't figure out how you actually put it on. Can you explain or show a picture? Feeling a bit daft"

Thanks for writing in and following Melinda, I hope the below GIF clears up any confusion you have! Also, don't feel bad, I made one for a friend and she was completely puzzled and didn't even know how to begin to put it on.


Also, regarding your second inquiry 
"Also, any suggestions on how to measure if I wanted to make this for a child or plus size adult? How did you decide on 29 in" 
 
Width can we calculated by measuring elbow to elbow with your arms straight out in a t position. Length can be calculated by measuring shoulder to waist and multiplying by 2.
 
Hope these tips help!
 

Thursday, October 31, 2013

Happy Halloween!!


For the first time ever I decided to DIY my very own Halloween costume.  A group of friends and I decided to go as General Mills mascots: The Honey Nut Cheerios Honey Bee, The Hamburger Helper Hand, Betty Crocker, Trix Rabbit, The Lucky Charms Leprechaun, and of course the Green Giant. 
 
I immediately jumped at the Green Giant costume because I could visualize exactly how I was going to make it.
 
Materials List: 2 yards of green felt,
green zipper, fabric chalk, green thread, scissors, sewing machine; Green Long sleeve shirt, green tights


Turn Right Side Out
Using the fabric chalk, free hand draw a leaf onto felt, cut; then use this leaf as a pattern for all leaves (in total I cut 26 leaves)
Use fabric chalk to draw veins into each leaf
 
.

Pair with green tights and a green long sleeve shirt, and you have yourself a costume!

Tuesday, October 22, 2013

DIY Sew: Decorative Couch Pillow

This week's tutorial continues on last week's theme, revamping small elements in your apartment/home easily and on the cheap.
What better way to add some warmth to a room than to make colorful decorative pillows.
 
Here's what you'll need:
fabric
12'' zipper
matching thread
seam ripper
scissors
sewing machine (optional)


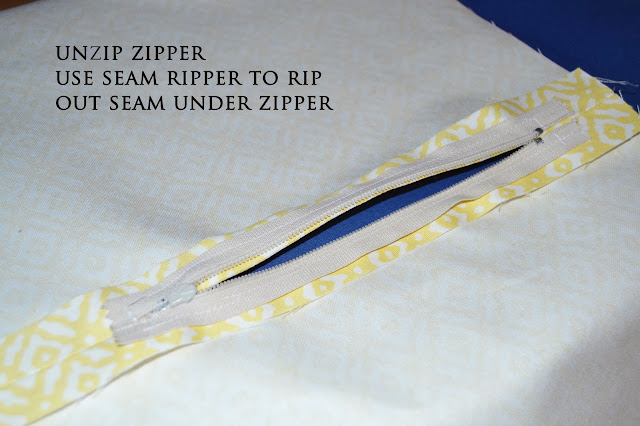
sew zipper onto the seam (use zipper foot if you're using a sewing machine)


Monday, October 14, 2013

DIY Blanket Headboard


Recently I decided it was time to make some changes in my bedroom.  I wanted to create a focal point in the room and thought that a head board would be just the element I needed.  Wanting to create something that wasn't bulky or expensive I thought draping a throw blanket over a curtain rod would work perfectly.
 
Here's what you'll need to recreate your own:
Throw Blanket
Curtain Rod
Curtain rod brackets
Hammer
Nails
level
 
Step 1: Decide on placement of your curtain rod
Step 2: Nail in brackets
Step 3: Drape blanket over the curtain rod

Done!