Pages

Monday, December 19, 2011

How to: Use a Sewing Machine!

Christmas came early this year! I caved and bought myself the Janome Sewist 500, a little christmas present to myself for being so good this year. I could not be more excited, my mind is flowing with a million different things I'd like to try to learn to sew. You are sure to see a lot of new posts about sewing in the coming months.


In high school I had a brief stint with sewing, but between sports and school, time was never on my side. After sewing one pair of pants, my dreams of sewing fell to the waste side... of course, until now!
A few months ago, I decided I wanted to learn how to sew, again. I dusted off my old sewing machine (which hardly got any use) and as soon as I attempted to sew my pattern together the machine broke. Not a good sign. Since the machine was pretty cheap and not so good to begin with I decided not to get it repaired.
Instead, I figured I'd try to take an intro sewing course, see if in fact I really liked sewing, and then buy something that would last.

I took the intro class, and really enjoyed it, although sewing in a straight line was much harder than I anticipated!

Here's what I learned...
The first step in threading your machine is to thread your bobbin; my machine luckly has a bobbin threader, if yours doesn't you'll have to wind the thread around the bobbin by hand. If you have a machine with a bobbin threader all you have to do is thread the thread through the top hole of the bobbin, leaving about 2 inches of thread at the top


Next, push the bobbin into place at the top of your machine


Wrap the thread around this screw looking thing (sorry don't know technical terms yet!)


Secure your thread on the machine


You should now have something that looks like the below


Now get ready to step gently on the petal, while holding the top two inches of thread above the bobbin (make sure you plug the petal into the side of your machine and put it on the floor first)


After you step on the petal gently for about 15 seconds your bobbin should be full


Now thread your machine by following the symbols on the machine


In order to put your bobbin correctly into the machine, you must first take off the cover, and then position your bobbin like a P, having the thread fall on the left side of the bobbin


Snap the bobbin into place


Now, wind your needle down and then up, and the thread from the bottom should come up to join the thread on your needle


Snap the cover into place; now your ready to sew your first project


Just to practice sewing in a straight line, I took out all the thread from my machine, and used a small piece of paper, I'd suggest doing this a bunch of times until you feel comfortable with your abiliites, then you can move onto fabric


Happy Sewing!

Monday, December 12, 2011

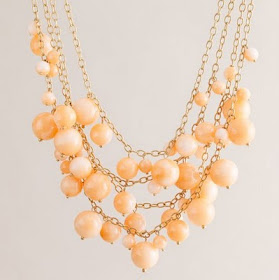
DIY: JCrew inspired Ribbon Necklace


Above is my first ever attempt at jewelry; and although it doesn't look extremely professional, I definitely think it's nice enough to wear out! Plus it only took about 15 minutes!

I love colorful beads and ribbon, take a look at these jcrew creations that inspired me!


To make my necklace above, you will need:

white ribbon
45 round beads
12 small beads for the ends(not neccessary)
Bead cord
scissors

First cut your strands of beads (you will have a ton of loose beads everywhere!)
next formulate a pattern for your necklace
Now you're ready to begin stringing your beads
I decided to use this pattern:
tie a knot; strand 2 end beads, 16 beads, 2 end beads, tie off, snip bead cord
tie a knot; strand 2 end beads, 15 beads, 2 end beads, tie off, snip bead cord
tie a knot; strand 2 end beads, 14 beads, 2 end beads, tie off
Now put the strands in height order, longest on the bottom, shortest on top


Now tie all three strand ends together on both sides


Now, you are ready to incorporate the ribbon.
Decide how low you want your necklace to fall; mine measures about a foot and a half. Now you want to double this measurement, and cut the ribbon (I cut three feet of ribbon)
Tie both ends of the ribbon together
Open your ribbon into an oval; place 2 strands of beads on the top side of the ribbon, and the third strand on the bottom; now lift the bottom of the ribbon, and join to the top; shake until the beads fall into place

Because even as I'm re-reading this I've confused myself, I've attached a youtube tutorial link from themayofam that I think will prove helpful http://www.youtube.com/watch?v=fBuIaZO-JE4


Lastly snip off excess bead thread


wrap over your head, and wear!


Monday, December 5, 2011

Crochet Lacy Scarf


This week I decided to attempt a new crochet scarf pattern; The Lacey Shell!

There are a ton of free crochet patterns available on the internet, a few sites I use are caron.com, and lionbrand.com. Most sites provide free written patterns, but I suggest as a beginner you use the ever faithful tutorials on youtube. Once you've mastered all stitches you can go back to the written patterns and work from there.
As I am still learning myself, I decided to browse a few videos, and stumbled upon this awesome tutorial.(one day mine will look this professional!)
http://www.youtube.com/watch?feature=endscreen&v=iUOjaeBnZls&NR=1

I altered the pattern Slightly:

Here's the Pattern I used:

Chain 27


ROW 1: turn, single crochet in the 2nd chain from the hook and each remaining chain (you will have 26 single crochets); chain three, turn


ROW 2: Skip 3 single crochets; in the 4th single crochet create a shell (shell= 3 double crochets, chain 2, three double crochets; all in the same single crochet); next skip 5 single crochets, and crochet a shell in the 6th single crochet; continue until you reach the end of the row; double crochet in the last single crochet of the row; chain 3; turn


ROW 3 and on: repeat ROW 2 until you've reached your desired length

 
Below pictures show the scarf in stages


If desired add fringe(see earlier post How to: Add Fringe to a Scarf for tutorial)


Complete! This would make a great gift for a friend or female family member!